
Diesel-powered Equipment in Metal and Nonmetal Mines
Actions or Tasks Addressing Implementation Management
| "Mention of any company name or product does not constitute endorsement by the National Institute for Occupational Safety and Health." |
|---|
I do not know whether there is a site champion for DPF selection, installation and maintenance at this mine or in my company.
The Compliance Assistant suggests that you ask your supervisor or other management personnel if there is a person who has been designated to coordinate the implementation of DPFs at your mine. If no one has been selected, then check here for an explanation why it is a good practice to have a site champion.
[ CLOSE ]
You have indicated that there is no designated site champion for DPFs at your mine.
Read the reason it is important to have a site champion for implementation of diesel particulate filter technology. Then discuss with your management the need for them to consider selecting a person to oversee and coordinate the selection and installation of DPFs at the mine by assembling a team with key personnel from ventilation, industrial hygiene, engine maintenance, vehicle maintenance, production, and operators.
[ CLOSE ]
Actions or Tasks on the Engine
I do not know whether the engine is a 2- or 4-stroke engine.
Try the following to determine the stroke of the engine:
- Ask the maintenance department or mechanic,
or - Get the engine make and model and call
- MSHA
- Engine manufacturer, supplier, or rebuild shop
[ CLOSE ]
Yes, the engine is a 2-stroke engine.
The exhaust from 2-stroke engines contains lubrication (crankcase) oil and generally emits PM at high rates compared to modern 4-stroke engines. Both of these characteristics adversely affect the selection and operating characteristics of a DPF. For active regenerating DPF systems, the size/capacity of the DPF will be larger than a DPF for an equivalent 4-stroke engine. Additionally, the lubrication oil contains metals which is the dominant source of ash that accumulates in the DPF. Because the ash cannot be burned off by simple thermal regeneration and because of the large oil component in the exhaust of a 2-stroke engine, the ash builds up more quickly than with 4-stroke engines. A DPF on a 2-stroke will require more frequent cleaning to remove the ash than if it were on a 4-stroke engine.
Because of these effects on the DPF, and because the 2-stroke engine is an older technology, the Compliance Assistant urges you to consider replacing the 2-stroke engine with a modern (electronically controlled) 4-stroke engine of equivalent power, or retire the vehicle from service.
[ CLOSE ]
Yes, the engine is burning oil.
When the target engine burns oil, you need to correct this problem.
- Make repairs to the engine (e.g., replace the rings, rebuild the engine) and confirm that the engine no longer consumes oil;
or - Replace the engine with a rebuilt engine and confirm that this engine does not consume oil;
or - Replace the engine with a new engine, preferably a newer technology engine that has lower PM emissions. The MSHA M/NM rule has specific requirements on introducing engines to your underground mine, §57.5067. Contact your equipment manufacturer for a list of MSHA or EPA certified engines that will fit your equipment.
DO NOT INSTALL DPF's ON ENGINES THAT BURN OIL, ARE OVERFUELED, OR ARE IN GENERALLY POOR CONDITION.
[ CLOSE ]
I don’t know whether target engine burns oil.
Records of the crankcase oil consumption of this target engine should have been kept. Check with the maintenance person responsible. If there are no records, instruct maintenance to start keeping records because you need to know this information and it is important.
[ CLOSE ]
I don’t know what the exhaust CO concentration of my target engine is.
You need to know the engine CO emissions of this engine.
- Check the maintenance records. If CO records are maintained, the data should be there.
- If there is no CO emission record for the target engine, then you should take steps to obtain exhaust CO concentrations. Since this is so important, you should invest in an exhaust measurement instrument or combustion analyzer. The better instruments measure Oxygen (and compute the Carbon Dioxide concentration), Carbon Monoxide, Nitric Oxide (NO), and Nitrogen Dioxide (NO2). Some provide software that makes measurement and recording of data easy. Some instruments can obtain the Bacharach smoke number which can be used for assessing the filtration quality of the DPF on an ongoing basis after installation. A partial list of combustion analyzers is presented below.
You should also investigate instituting an emissions based maintenance program.
[ CLOSE ]
Combustion Analyzers for Measurement of Diesel Tailpipe Emissions
|
Manufacturer |
Model |
Measures |
|
UGAS, ECOM-AC |
O2, (CO2), CO, NO, NO2, smoke number |
|
|
Model 400 |
O2, (CO2), CO, NO, NO2 |
|
|
True Spot |
Smoke number only |
[ Go Back (within this window) ]
Actions for high CO emissions
I know what the target engine exhaust CO concentration is, but I don’t know whether the level is acceptable.
- If a record of the CO for this specific engine has been kept, then the exhaust CO is acceptable if it is within the historical variations of the CO for that specific engine.
- If you have no CO baseline or CO records for this specific engine,
- contact MSHA A&CC angel.james@dol.gov at 304-547-2064 or the engine manufacture to obtain the CO levels that are acceptable for your engine. MSHA may have a list of these on its web site,
and
- Institute an emissions based maintenance program for this engine and purchase appropriate exhaust measurement instrumentation as described here.
- [
- Yes, the target engine has high CO exhaust concentrations; I need to reduce them.
- The causes for elevated CO emissions can be the following:
- Air intake restrictions such as a clogged air intake filter; check or replace it with a clean filter.
- Overfueling of the engine, that is, the fuel rack is set too high for the altitude of operation. Have an engine mechanic qualified on the target engine check fuel rack setting and adjust if necessary for altitude according to the engine manufacturer’s guidelines. Take this opportunity to reduce the fuel setting to reduce engine horsepower and significantly reduce DPM emissions if the target equipment does not need or use the full horsepower of the engine. You can save fuel, reduce tire wear (tire slippage), and reduce DPM and CO emissions by reducing the fueling rate (derating) the engine.
- Low compression or worn engine. Have the engine serviced and rebuilt if necessary.
- Improperly set timing. Have the engine serviced.
- Establish and emissions based maintenance program.
- [ CLOSE ]
- MNM DPF Selection Actions or Tasks
- The following section presents the tasks which must be accomplished to ensure proper selection of a Diesel Particulate Filter which best suits the target equipment and its operational situation. Acquire Exhaust Temperature Traces
- I have decided that I may want to get temperature traces for the target vehicle myself.
Below are the steps for getting exhaust temperature traces. Also, MSHA or NIOSH can assist you in equipment selection and its use.
- Obtain the necessary temperature logging equipment (example). The items include the following:
- Locate a spot for the temperature probe on the existing exhaust pipe at the point where the DPF would probably be attached. Contact MSHA, angel.james@dol.gov or 304-547-2064 before installing a probe on a part 36 permissible machine.
- Make a 1/2" diameter hole in the wall of the exhaust pipe and weld a 1/2" NPT coupling to accept the 1/2" male adapter for the temperature probe;
- Insert thermocouple probe so that the tip of the probe is at the center of the pipe. Snug fittings;
- Locate a safe and cool place on the vehicle for the logger and fasten it securely;
- Using connectors and the thermocouple wire, make an extension from probe to logger taking care to wire the connectors correctly to the colored wires; or skip this step and use a purchased extension;
- Connect one end of the thermocouple extension to the thermocouple and the other end to the logger;
- When you are ready to collect data (start of the shift), activate the logger.
- At end of the shift, download the data to a laptop or desktop PC according to the logger instructions;
- When convenient, examine the data to ensure logger and thermocouple are working;
- Collect the data for several shifts; if different shifts involve quite different tasks, then ensure that the different shifts are profiled several times. For example if a loader loads trucks from the muck one shift and does clean up on another shift, both shifts need to be profiled several times. If the equipment performs a variety of tasks over a single shift, and every shift is somewhat similar, then profile this shift several times. The objective is to profile the shift that produces the lowest exhaust temperatures.
- For each different type of shift logged, describe the tasks performed. These descriptions will be of help to characterize the temperature profile for possible application to other equipment and will be part of the temperature profile information you will provide to the DPF suppliers for DPF selection.
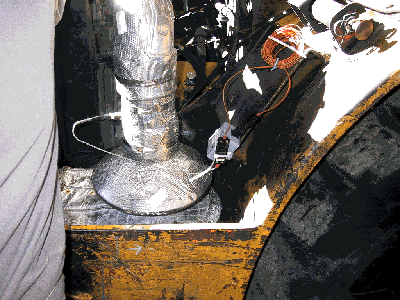
- A photo of the temperature data logging instrument on a vehicle. Click on picture to enlarge.
Self-contained battery-powered temperature logger for Type K thermocouple. The logger should be able to log a temperature every 15 to 30 seconds for a full shift (about 3000 data points for a 12-hr shift logging every 15 seconds). A cigarette pack sized logger is available that can log over 8000 points for a little over $200 and includes software.
Stainless steel thermocouple type K temperature probe, 1/8 inch or larger diameter and of length long enough to reach to the center of the exhaust pipe from an female NPT port in wall of the exhaust pipe. These cost about $30.
NPT to compression fitting adapter to hold thermocouple;
Type K thermocouple wire, type K connectors male and female to make an extension of the thermocouple leads, or purchase (about $15) a fabricated extension, tie wraps, etc.
Laptop or desktop PC with software for downloading data from logger.
|
[ CLOSE ] |
- Temperature Logging Items from OMEGA Engineering
|
Part Number |
Description |
Cost |
|
OM-SL-L620 |
Self-contained data logger for Type K thermocouple (See note below) |
$207 |
|
KQ1N-14G-12 |
Type K Thermocouple, 12" long, 1/4" diameter, standard plug connector |
$27 |
|
GECK10-4 |
10-ft extension, Standard Jack, Miniature plug, Type K |
$15 |
|
Hardware item |
1/2" NPT male to 1/4" compression fitting adapter |
? |
|
Alternative, smaller thermocouples and extension |
||
|
KMQSS-125G-6 |
Type K Thermocouple, 6" long, 1/8" diameter, miniature plug connector |
$24 |
|
GECK10-4 |
10-ft extension, Miniature connectors, Type K |
$15 |
- Note: Make sure the software included with the logger is version 6. Version 5 will not run on Windows 2000 or NT. Version 5 runs on Windows 98.
- [ CLOSE ]
- You have decided to contact a DPF supplier or consultant to obtain exhaust temperatures. Here are some things to consider.
- Be aware that not all DPF suppliers or manufacturers offer both active and passive DPFs. There may be consequences if the temperature profiles do not result in a recommendation of a product offered by the DPF supplier or manufacturer.
- Make certain (negotiate an agreement) that you own the temperature data that is obtained by the DPF supplier or contractor providing the exhaust temperature logging service. If there is a fee, ask whether the fee includes an analysis of the temperature profile and what that analysis provides (it should provide the critical information on exhaust temperatures and duty cycles that allow selection of the proper DPF.
- Make certain that temperature traces are obtained for all full-shift scenarios that the equipment experiences. Temperature trace data should be obtained for each of these possible scenarios several times.
- For every shift for which temperature traces are obtained, describe the activities of the equipment in general terms for your records and to provide to the supplier along with the logged data.
- If the DPF supplier cannot come to your mine to set up the temperature profiling instrumentation, he may offer to lend you or sell you the equipment for you to install to acquire the temperature yourself. If this is the case, you might want to consider buying the parts recommended in "I want to take the temperatures myself" response to the question.
- [ CLOSE ]
- Exhaust Temperature Trace Analysis Procedure
- Note that many DPF suppliers will want your raw exhaust temperature data for their own analysis, so you are not required to do this analysis. However, when you are faced with reassigning the equipment to a different type of work, and it is using a passive DPF, you will have to reassess the exhaust temperatures. You can use your analysis of the present data as a baseline for comparing the effects on exhaust temperature from the equipment reassignment.
- You have decided to analyze the exhaust temperature traces yourself. Below is an outline of one way to obtain an estimate of the critical temperature governing the possibility of using a passive regenerating DPF on the target equipment. The method below was designed to operate on data produced by the data logger mentioned in the equipment kit.
- Download the data
- If you remove the data logger from the equipment, stop the data logger prior to disconnecting the thermocouple. If the logger remains on the equipment, stop it from logging, but do not shut it off.
- Start the software, remove the protective cap over the data jack, and then connect the cable from the PC to logger.
- Assuming that you have tested all of this and everything is set correctly, select "Download." You will have an opportunity to set the current time to the correct local time. This is important as all the data on the logger is referenced to this time setting.
- Downloading the data starts when time is set.
- Optionally select, "Function" and set to "Deg C."
- Save the data as a *.txt file using something to identify the equipment and date in the name.
- Shut off the data logger to clear memory and restart if appropriate.
- Importing data into a spreadsheet
- Import or otherwise put the logged data for one shift into spreadsheet software, for example, Microsoft Excel®. The logger used as an example, saves the data as *.txt file. Using the File | Open in Excel, navigate to the folder containing the temperature *.txt data file; change the Files of Type: to "Text Files" so the data file becomes visible. Highlight the data file, and accept all the defaults by clicking on "Next" several times and then "Finish" as explained in the directions in the logger software manual.
- Save the file as an *.xls file.
- Clean up the data
- Below is only one way to use Excel to analyze the data to arrive at the critical temperature and depends on having data analysis add-in available. If you need assistance, contact NIOSH or MSHA-A&CC, or check here to download a spreadsheet that performs the temperature analysis from time and temperature data copied into the proper columns.
- Insert a new worksheet by right clicking on the sheet's tab, and selecting "Insert." Highlight and copy the time and data column by highlighting the two cells of numeric data appearing in column A and B, then keying Shift+Ctrl+END to highlight the entire data set. Follow with a CTRL+C. Move to the second cell in column A in the new sheet, and typing CTRL+V to paste in the data.
- Highlight the column designation "B" in the new sheet, right click and select "Format cells," select "Time," and select "13:30:55," as the format.
- Label the data columns with "Time," and "Deg C" (or "Deg F.")
- Change the font of the column titles to italic using the "I" button in the tool bar to provide Excel with a means to differentiate the headings from the numerical data.
- With cell A2 highlighted, select Data | Sort from the menu, then check "Header row" if not checked, and select to sort by "Deg C" (or "Deg F"). Choose "Ascending" Select "Okay" to sort. The data is sorted so that the lower temperatures at the top.
- Highlight each entire row with a temperature less than 100 deg C or 200 deg F.(Highlight the first sheet row number then hold shift down while using the down arrow to highlight every row until the temperature has increased to 150° C (300° F). Delete these rows of data using a right click of the mouse and selecting "Delete." Save this file.
- Re-sort the data using "Time" as the sort column to place the data back into chronological order. You have just removed "engine-off" data from the set. The exhaust temperature that represents the engine-off condition is approximate and assumed to be below the exhaust temperature at idle.
- Data Analysis
- Steps 1 - 9 calculates a 3-minute moving average. You can skip these steps but need to change the reference to column C in step 10 to column B.
- Examine the data time and count the number of rows used for the time to advance by 3 minutes using the data where the time is seen to advance in regular increments. Don't start counting with the initial time, but start several minutes into the log where the numbers in the "Time" column (A) are sequential. Note the row numbers where 8:35:33 and 8:38:33 appear, for example. The difference of these row numbers is the number of data points to be averaged for a 3 minute average. Note this number.
- Use End key plus down arrow key to go to the last row of data and also note the spreadsheet row number.
- Go to Tool | Data Analysis and choose "Moving Average" by scrolling down past "Histogram" in the list.
- For the input range enter $B$2:$B$nnnn where "nnnn" is the true last row number for your data.
- For the "Interval," enter the number of rows you determined in step 1 that represent 3 minutes of data in your log.
- For the output range select the top of the next column $C$2; it really doesn't matter as long as the column is empty.
- Check the box to produce a chart.
- Select OK to execute the moving average. Note the first few data points generated contain "#NA."
- Right click inside the chart area but outside the graph, select "Location" and select "As a new sheet" and name the sheet "MovAve3" for 3 minute moving average.
- Go back to Sheet 2 with the data and go to Tools | Data Analysis and select "Histogram." Choose the Average data that you just generated in column C, as the input range. It is best to manually type in the range by noting the starting row of the first number where the "#NA" stops and the last row: $C15:$Cnnnn for example, where nnnn is the last row of your data ($B15:$Bnnn if you skipped steps 1-9).
- Select a location for the histogram data to the right of the current data. Leave room for more averages if you want to do them.
- Leave the Bin range blank. Check "Cumulative Frequency" and "Chart" check boxes. Click on "Okay" to execute.
- Go to the new chart, and as before right click inside the chart but outside the plot area and select "Location" and move the chart to new sheet.
- Examine column labeled "Frequency" and find the percentage that is close to 70%. Keeping in the same row, move two columns to the left and note the "Bin" temperature. You have now located the critical temperature, the temperature the exhaust exceeds 30% of the time. Make note of this temperature which will be denoted as T30%.
- [ CLOSE ]
- You will be submitting exhaust temperature traces to a DPF supplier or consultant for analysis.
- Here is a list of what you need to do.
- Provide a description of the equipment, make and model.
- Provide photos and dimensional drawings of the area surrounding the engine.
- Provide the engine make, model, date of manufacturer, hours since last rebuild, and CO emissions. The engine should not be consuming oil.
- Assemble the electronic data logs of the exhaust temperatures. On paper or in a computer document, try to describe the different types of work that each shift represents (if the shifts are different) and the work tasks within a shift. Reference these descriptions to the specific data logs.
- Ask the DPF supplier or consultant what other information they may need. They may ask for the following information (for mobile equipment):
- Ask for the results of the analysis.
Whether there is an hour or two of idle time between shifts.
Whether the vehicle is or can be parked in the same place between shifts.
Whether there is a source of electric power near the parking place or whether a regular parking place can be arranged where there is power available.
The ventilation rate where the vehicle spends the majority of its working time. There may be several different rates if the vehicle is used differently on different shifts.
Current CO, NO, and NO2 levels in the typical working areas.
Whether ventilation rates can be increased from those stated above.
Where and when fueling for this vehicle is done underground.
Whether it is possible or there is a willingness to support the exchange of DPFs for the vehicle every shift.
- [ CLOSE ]
- Installation and Operation Considerations for Passive DPFs
- General considerations for installation of a passive DPF.
- Mount the DPF as close to the exhaust manifold of the engine as possible.
- Insulate the exhaust system between the exhaust manifold after the turbocharger and past the DPF. Contact the filter manufacturer before insulating the filter housing.
- Exhaust back pressure monitoring with an alarm, as the bare minimum, must be installed with a passive DPF. The preferred installation would include a logger with a wrapping memory with sufficient capacity for several shifts of data of the 30-second averages of both exhaust back pressure and exhaust temperature. The preferred installation also provides a direct readout of back pressure and/or visual indicators (green-yellow-red colored LED bar graph) to provide both ample indication and ample warning of abnormal increase in back pressure. In case of a regeneration problem, the data from the logger could be downloaded and examined to learn the events (engine conditions) that may have caused lack of DPF regeneration.
- At the regularly scheduled preventative maintenance (PM) (every 250 engine operating hours) the engine emissions upstream and downstream of the DPF should be checked for CO and . Smoke Number These measurements should be a part of an Emissions Based Maintenance program. Any increase in CO upstream of the DPF or smoke number downstream of the DPF would be indicative of a change in engine condition and a leak or crack in the DPF, respectively. A partial list of combustion analyzers was presented above.
- The normal exhaust back pressure will increase slowly owing to the accumulating ash. In due time (1000 hours more or less), the DPF should be removed and cleaned of ash by following the manufacturer's recommended procedure.
|
[ CLOSE ] |
- Specific installation considerations for DPFs using fuel borne catalysts
- The installation of the DPF itself is straightforward and should follow the general installation considerations (above) for passive DPFs. However the requirement for a fuel borne catalyst (FBC) introduces added considerations:
- Upon a new "green" installation, the DPF (and engine) must be first run with a heavy dose of FBC to coat all the engine and exhaust components with the catalyst. The DPF supplier's instructions should be followed rigorously.
- The FBC must be in the fuel in adequate concentrations at all times. Moderate overdosing is not a problem but is wasteful. A system must be established that ensures the presence of the FBC in the fuel. Some of the options are the following:
- Because of the use of the FBC and the desirability of not releasing it into the workplace, it is important to monitor the filtration status of the DPF on a regular basis. The use of the smoke number is highly recommended at regularly scheduled maintenance. The purchase of a combustion smoke tester or combustion analyzer with built in smoke number testing provisions is recommended. A partial list was presented above.
On-board auto dosing system which senses the fuel added during fueling and meters in the proper amount of FBC
Separate fueling storage and distribution system for the equipment requiring a FBC. A mechanism must be established that prevents fueling any equipment with the improper fuel, e.g., special nozzles that mate with the fuel tank.
Manual dosing by noting the fuel taken on during refueling and filling a vessel to the appropriate mark with the FBC and adding it to the tank
- [ CLOSE ]
- Heavily catalyzed DPFs have been found to convert significant portions of engine-out NO (compliance level of 25 ppm) to NO2 (compliance level of 5 ppm). Not only is the compliance level of NO2 5 times lower than that of NO, the health effects of NO2 are more serious. As a result, it is necessary to monitor the workplace continually for NO2 preferably using a direct-reading hand held instrument.
- Should the NO2 levels be unacceptable, then ventilation must be increased. Should that not be possible or fail to reduce the NO2 concentrations to acceptable levels, the catalyzed DPF system must be abandoned in favor of an active DPF system.
- Refer to MSHA PIB P02-04 regarding issues with NO2 emissions with heavily Pt-catalyzed DPFs.
- [ CLOSE ]
- Installation and Operation Considerations for Active DPFs
- General considerations for installation and operation of an active DPF.
- Unless the exhaust temperature is borderline for the DPF (for example, the DPF is a base-metal catalyzed system that just does not quite passively regenerate), the active DPF can be mounted anywhere that is convenient. The exhaust pipe between the engine and the DPF does not need to be insulated. There may be a preferred mounting orientation to the DPF that must be considered.
- The DPFs are sized to store soot for the full shift or operational period between regenerations. As a result, they are larger than the comparable passive DPFs for the same engine.
- All DPF system installations require an exhaust back pressure monitor and alarm with multiple indicator lights representing good, marginal, and unsafe exhaust back pressure levels. Back pressure monitoring is needed because as the ash builds up during use, a regenerated DPF will start the shift at progressively higher exhaust back pressure leaving less capacity for soot loading. At some point, the back pressure alarm will start coming on near the end of the shift because of this lack of capacity for soot. The DPF will have to be cleaned of the ash, unless the regeneration station does this as part of the regeneration process. The point here is that a full shift of operation is to be expected before the "red" back pressure light comes on; this is the design criteria used by the DPF manufacturers. The other point is that the system is probably sized with an over capacity to account for a reasonable amount of ash buildup; however, the capacity of the DPF may not be suitable to collect soot for two full shifts. The function of the alarm light is to prevent engine and DPF damage from extending the operation beyond the capacity of the DPF and the acceptable engine back pressure. [ Go Back (within this window) ]
- After installation, at the routinely scheduled preventative maintenance (every 250 operating hours), measure and record CO and smoke number downstream of the DPF.
- [ CLOSE ]
- Help on Active DPF Installations
- Installation and Operational Help for Active DPFs with off-board regeneration (DPF exchanging or swapping)
- The following are some important installation and operational criteria for off-board regenerating DPF systems:
- Engine horsepower should be less than about 150 otherwise the size of a single DPF makes it unwieldy for one person to handle.
- Larger engines may be accommodated if multiple DPFs are used so that one DPF can be removed by one person.
- Locate the DPF (it can be anywhere as long as the exhaust can be piped to it) on the equipment to provide easy access and handling by a person. Active DPFs may be larger than comparable passive DPFs for this equipment/engine since active DPFs must store the soot for a full shift's operation without creating unacceptably high exhaust back pressures. There may be a preferred orientation of the DPF. Check with the supplier.
- Work with the DPF supplier to ensure that the connection between the exhaust system and DPF uses a quick and gasket-free couplings. Mating flanges that use a tapered "tongue and groove" to ensure against leaks are available. They can be securely held together with lever-type band clamps.
- For equipment not operating for a full shift, DPF regeneration schedule may be reduced to less frequent than once per shift. However, it is important that the DPF exchange be performed on a naturally occurring schedule, such as every shift, daily, or weekly rather than every other day or shift. Waiting until the red light (high back pressure) goes on is not good practice, since it may come on mid-shift when DPF swap out is not possible. Thus the "wait until needed" approach is not an option.
- The DPFs must be protected during transport between the regeneration station and the equipment. If the DPF is transported by vehicle, protection must be provided to prevent physical damage to the exposed filter media, and from shock and vibration. Consider building a protective container dedicated to the transport of the DPF.
- If transportation of the DPFs from surface to underground seems to pose logistical problems and risks of damage to the filter, consider locating the regeneration facilities underground in a convenient location to the vehicles using the DPF. Such a location might be in an area of the underground shop, or near the cage, etc, where there is electric power, some ventilation, and is free of combustibles.
- Ensure that the regeneration station has built-in safety features such as fail-safe over-temperature protection of the heating coils (e.g., a fusible link) and a closed-loop temperature controller on the heater.
- This (as with all) DPF installation requires an exhaust back pressure monitor and alarm with multiple indicator lights representing good, marginal, and unsafe exhaust back pressure levels. See General Installation Considerations.
- For equipment that is or can be parked at a designated and fixed location between shifts you need to do the following:
- Roaming equipment, not parked in any set location between shifts, poses more challenging logistics. We offer some things to consider:
- The logistics of ensuring the availability of timely DPF exchange for those vehicles that operate and take on fuel on different levels or locations poses quite a challenge for off-board regeneration DPF systems. On-board regenerating DPF systems should be considered for these cases.
Devise a materials handling system to ensure that a fresh DPF is available to the equipment at the start of every shift or when needed. It is advisable to devise such a system in advance of actually deciding on using the off-board regenerating DPF. Mock up the scenario and run through it.
Consider locating the regeneration station/facility near to the parking area of the equipment. MSHA has developed best practices guide for underground regeneration of DPFs.
Consider locating the DPF regenerating station or facility underground at a location convenient to the transportation system used underground.
If the equipment operator uses some personal transportation vehicle to get to the equipment with the DPF, consider devising a DPF container on that vehicle and having the equipment operator take a fresh DPF to the vehicle and exchanging it himself. Since the operator will not return before the end of the shift, the DPF set for this equipment would have to include another DPF (total of three). The DPF swap has to be able to be easily done by one person in this case.
As above, but the equipment operator is driven to the equipment using the DPF, then there are two people to perform DPF swapping. Also there possibly is a means to get the removed DPF back to the regenerating station for regeneration before the next shift.
One could consider swapping out the DPF during equipment fueling. This would involve removing of a hot DPF. It would also require that the replacement DPF be at the fueling area (or on the fueling truck) without fail. This in turn would depend upon someone to ensure that this happens. With several vehicles using DPFs and fueling from the same central location, this may be practical.
Mock up the logistics first. Run through the scenarios using a token such as a block of wood to represent the DPFs.
- [ CLOSE ]
- Installation and Operational Help for Active DPFs with On-board Controllers
- The following are some important installation and operational criteria for on-board regenerating DPF systems:
- The DPF can be located anywhere on the equipment that is convenient and to which the engine exhaust can be piped. The active DPFs may be larger than comparable passive DPFs for this equipment/engine since active DPFs must store the soot for a full shift's operation without creating unacceptably high exhaust back pressures. There may be a preferred orientation of the DPF. Check with the supplier.
- Provide the DPF supplier with photos and dimensional drawings or whatever is asked for in order to facilitate the location of both the DPF and the regeneration controller on the equipment. The DPF supplier should see the equipment first hand. Expect or insist on an on-site visit.
- In locating the DPF on the vehicle, take into consideration that the surface of the DPF may get much hotter during regeneration than during operation of the equipment. Keep combustible materials away from the DPF or insulate it. Consult with the DPF supplier on this matter.
- Until you are familiar with the installation of this type of DPF, enlist the assistance of the DPF supplier in the installation of the system.
- Make certain that the electric heater coils of the regeneration system have a fail-safe over-temperature protection (high temperature fusible link) and a closed-loop temperature controller.
- Mount the temperature controller and combustion air pump in a protected area away from engine or DPF heat.
- This (as with all) DPF installation requires an exhaust back pressure monitor and alarm with multiple indicator lights representing good, marginal, and unsafe exhaust back pressure levels. See General Installation Considerations.
- Make sure that the electrical supply and connections to the vehicle meet the applicable codes and regulations.
- Make sure that the electrical supply has sufficient capacity. If you need to upgrade it, take into account that there may be additional pieces of equipment needing power for DPF regeneration at this location.
- Operational considerations:
The equipment must have sufficient off-duty time daily or between shifts for the regeneration of the DPF. Depending on DPF manufacturer, filter size, and filter media, regeneration times can be as short as 1 hour or as long as 8 hours. Thus as a minimum the equipment must have a downtime of more than 1 hour per day or per shift.
The equipment must be brought to a source of electric power capable of supporting the regeneration system. Discuss the power requirements with the DPF supplier.
Prepare the parking/regeneration area so that there is some flow of ventilation air to remove the combustion gases (CO and CO2) from the DPF during regeneration. Some DPF manufacturers offer an oxidation catalyst after the DPF that reduces CO and hydrocarbons both during regeneration and operation.
- [ CLOSE ]
- Installation and Operational Help for Active DPFs with Off-board Controllers
- The following are some important installation and operational criteria for off-board regenerating DPF systems:
- The DPF can be located anywhere on the equipment that is convenient and to which the engine exhaust can be piped. The active DPFs may be larger than comparable passive DPFs for this equipment/engine since active DPFs must store the soot for a full shift's operation without creating unacceptably high exhaust back pressures. There may be a preferred orientation of the DPF. Check with the supplier.
- Provide the DPF supplier with photos and dimensional drawings or whatever is asked for in order to facilitate the location of the DPF. The DPF supplier should see the equipment first hand. Expect or insist on an on-site visit.
- In locating the DPF on the vehicle, take into consideration that the surface of the DPF may get much hotter during regeneration than during operation of the equipment. Keep combustible materials away from the DPF or insulate it. Consult with the DPF supplier on this matter.
- Until you are familiar with the installation of this type of DPF, enlist the assistance of the DPF supplier in the installation of the system.
- Make certain that the electric heater coils of the regeneration system have a fail-safe over-temperature protection (high temperature fusible link) and a closed-loop temperature controller.
- This (as with all) DPF installation requires an exhaust back pressure monitor and alarm with multiple indicator lights representing good, marginal, and unsafe exhaust back pressure levels. See General Installation Considerations.
- Locate the regeneration controller in a physically protected area and convenient to the area where the equipment is to be parked during regeneration. Make sure electrical connections meet applicable codes and regulations both from the mains to the controller and from the controller to the regeneration heater on the equipment.
- Make sure that the electrical feed to the regeneration area has sufficient capacity. If you need to upgrade it, take into account that there may be additional pieces of equipment needing power for DPF regeneration at this location.
- Operational considerations:
The equipment must have sufficient idle time daily or between shifts for the regeneration of the DPF. Depending on DPF manufacturer, filter size, and filter media, regeneration times can be as short as 1 hour or as long as 8 hours. Thus as a minimum the equipment must have a downtime of more than 1 hour per day/shift.
The equipment must be brought to the location of the regeneration controller for its DPF. This requires the equipment to return to the same location at the end of every shift. If that is not possible, then multiple regeneration controllers have to be purchased for this equipment and located at the places where the equipment will be parking at the end of the shift. You must adjust equipment deployment and operation to ensure regeneration every shift.
Prepare the parking/regeneration area so that there is some flow of ventilation air to remove the combustion gases (CO and CO2) from the DPF during regeneration. Some DPF manufacturers offer an oxidation catalyst after the DPF that reduces CO and hydrocarbons both during regeneration and operation.
- [ CLOSE ]
- [ Return to Top ]
- Acknowledgments
- This document was authored by George Schnakenberg, Jr. in consultation with Aleksandar Bugarski, both with NIOSH, It was reviewed by Larry Patts of NIOSH and James Angel of MSHA. It represents the state of knowledge at the time of writing. Please address any comments about this document to George Schnakenberg, Jr., NIOSH-PRL, P. O. Box 18070, Pittsburgh, PA 15236, 412-386-6655.